warning - this is lengthy....
zippered bag with inside pocket.
a nice deep bag to hold all your cosmetics or sewing supplies!
Supply list:
2 fat quarters one for outside, one for lining
+ a strip of contrasting fabric (could be on of the fq's )
a zipper - I used a 14" zipper from my stash - a 12" would be long enough.
fusible woven interfacing 18"x20" - I like Pellon's SF101
Fuse the interfacing to the outside fabric before cutting - easier than cutting and fusing all those little pieces! But, you can also wait to iron on the interfacing until after the front of the bag is assembled. I was already using scraps for this bag, so that's what I did this time....
 |
| you will need matching thread - a 1/4" foot and a zipper foot for this. |
the zipper from my stash... still good after all these years!
Cut 2 lining pieces and ONE outside piece 9" x 12" - set aside.
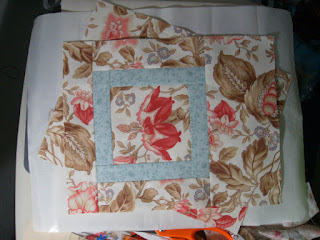
this lesson also included making a partial seam block - sometimes known as a "Patience Corner" - looks like a simple framed square, but the constructions is a little different! Notice the strips that surround the square are all the same length!
here is a sketch to remind you of this:
Add fabric strips to your block to bring the overall size up to 9"x12" - same as the lining(s) and back.
Cut 2 pockets from your remaining fabrics. any size - how big do you want your pockets? I cut mine about 5"x6"... because that's how much fabric I had left... it's a good size, esp. for little things that get lost at the bottom without a pocket!
and turn right side out - notice the bottom of the pockets are raw edges at this point....
position pockets with the top of the pocket toward the bottom of the lining - about half way down, depends on how big you cut your pockets - just make sure they are far enough down in the lining that they won't get caught in the zipper! (I made sure mine were wayyyyy down there).
now, sew across the bottom of the pocket
Fold the pocket up over the raw edges
make sure the pocket is parallel to the top edge - allowing for zipper seam allowances
then sew (topstitch) through sides and bottom of pocket - backstitching at top corners for extra strength!
Now, you are reading to insert the zipper - take it out of the package, if any, and press it nice & flat...
layer edges as follows:
1 lining piece facing up
zipper with tab facing up - zipper should be hanging out of both ends - this is intentional!
outside (block) facing down
sorry there isn't more of the zipper showing in these pics... it's not easy to sew with one hand and operate the camera with the other... at this point, the zipper tab is towards me, facing up.
...after checking to make sure the zipper tab faces the outside of your bag, press those seams away from the zipper and topstitch about 1/8" away from zipper teeth - this will keep the lining from getting caught in the zipper!
join the other two bag pieces to the zipper the same way - align the edges with the zipper partially opened
For an
excellent tutorial on the zipper application… check out this bag at the MODA
Bake Shop: http://www.modabakeshop.com/2011/08/scrappy-apple-bag.html#more
you will need a strong pair of scissors to cut through the extra zipper when you finish the bag...... mine had an accident!
Before the next step, make sure your zipper is 1/2 open - you will need to get your hand through it to turn your bag right side out. Do NOT cut the zipper tab off with the zipper closed! (don't ask me how I know!)
Now you will pin the two outside pieces together all the way around, with the STRAP inserted just below the zipper, loop toward the inside (so it will be on the outside after turning), raw edges aligned, and pin the two lining pieces together all the way around - mark where your opening will be so you can get your hand through and sew with a 3/8" or 1/2" seam from bottom of lining, up the side, across the strap and zipper (notice how the zipper teeth go toward the lining? that's a good thing!) and continue sewing all the way around to the other side of the opening in the lining.
Now, before you jump the gun and turn that bag right side out... put a piece of cardboard or file folder along that opening right where the seam would have been... and press it open against the card - this makes the closing step so much easier!
You will now be ready to 'box' your corners. You can do this by folding the seams together and sewing across the seams and trimming the extra away (make sure you get them all the same!) OR you can cut a little square out of each corner (I cut mine 1 1/2" including the seam allowance) and pull the raw edges together to close the box.
which ever you prefer... the links in the above paragraph to Lazy Girl's blog or Craft Apple both have excellent instructions for these methods.
 align the opening and sew it closed with a very narrow topstitch - backstitching at both ends.
nice and straight...
oops - wrong side out...
there, that's better!
I added a little something to make it easier to grab that zipper!
It won't be empty long!


