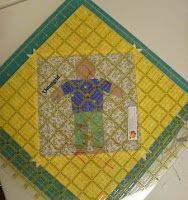
Your kit may make one of several different boy patterns, but I have selected the most difficult one for this tutorial.
Kit includes 4 yellow triangles and strips of background fabric
Please use your own scrap fabrics for face, shirt and pantsNOTE: Block is paper pieced to 5” x 7” (5 ½” x 7 1/2”) 2” wide strips of background fabric are to apply to each side to bring center blocks to 7 ½” before adding yellow triangles. Be sure to square up the center block to 7 ½” before attaching the yellow triangles.
Block will measure 10 ½” unfinished.
Many tutorials are available for paper piecing online. Youtube and Vimeo both have an abundance of options for brushing up on paper piecing…. Here is one I recommend: http://www.youtube.com/user/lcvday#p/search/0/9Bc1mU0LMF8
and
Mhttp://www.quiltingboard.com/t-67639-1.htm
BUT,
Most of them will not help you with this block. The blocks vary somewhat – some are slightly more detailed than others. All of the paper pieced blocks are made in sections, and then the sections are joined to form the blocks. I use a glue stick for the first piece in each section. Always sew paper foundation piecing with a short stitch – 12-14 stitches per inch. and use a fine thread - I like a 60 weight cotton or polyester.
After numerous experiences with cutting my fabrics just a tiny bit too small, I know now to cut paper piecing fabrics approximately ½ again as big as I THINK they need to be…and keep my threads trimmed to less than 1/2”. If pressing, use a hot DRY iron – NO STEAM! It blurs the ink from my ink jet printer!
Instructions:
3”x 6” piece for SHIRT, and two strips 4” x 2” for PANTS
BACKGROUND pieces are included in kit – set aside long strips for sides.
2. Cut apart pattern sections – patterns differ somewhat, but all have at least 3 sections
3. Glue flesh tone fabric to unprinted side of head section, add background to first corner.
4. Sew with short stitches on line – sew all the way through the outside seam allowance, but not through the sections on the interior of the block. It helps to have a lamp handy to check from the paper side.
5. Fold the next section on the line and use a ruler to trim seam allowance to ¼” for alignment of next fabric piece.
6. Build each section separately. Glue, sew, flip, trim, glue, sew, flip, trim, measure.
(this is one of the leg sections)
7. When all sections are complete – Trim exactly ON the dotted lines with rotary cutter and ruler AS YOU JOIN EACH SECTION TO ITS NEIGHBOR.
Save FINAL trimming of outside lines for after all sections are joined, as the seams always seem to take up more than I think they will…. quilting is NOT an exact science, remember?
8. Insert pins in adjoining corners to align sections. After joining two sections, remove paper in seam allowance before joining to next section. (see pictures, which I hope will make this clearer)
... remove paper from within the seam allowance to reduce bulk when joining sections. This paper tears very cleanly if your stitches are small enough.
10. Sew all sections together – trim paper pieced section to 5 ½” x 7 ½”.
11. Sew long strips of background fabric to sides, then square up block to 7 ½” x 7 ½”.
12. Check seam allowance and stitch length…. you can switch back to a longer stitch length for the rest of the block... make sure to sew yellow triangles onto paper pieced square with ¼” seams!
13. Sew yellow triangles to opposite sides, press open, sew on remaining triangles, press open.
14. Check to make sure block measures 10 ½” square.
NOTE: your block may be different than those pictured.
NOTE to QCE Members: Bring finished block to NOVEMBER 15 meeting in plastic baggy provided.
Remember to include your name on paper. Thanks.
And, just so you know how devoted I am, I did this block (and the pics and tutorial) at a fiber art retreat!
This is an example of what I could have been making:
Owl Pincushion by Wanda (Needlewings)
isn't it precious?
see more of her work at: http://needlewings.blogspot.com/
along with some very beautiful pics from her recent trip....


What a darling little block! Great instructions, too.
ReplyDelete